Setups With a Computer & an Analog Camera
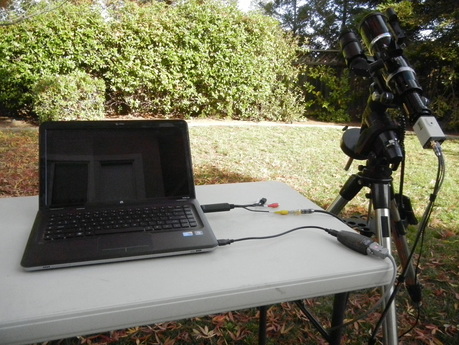
Using a computer for deep sky video is a bit more complicated than the non-pc setup, but it provides the additional capability to capture images, stack images and perform dark frame subtraction on the fly. It is also possible to control the camera with the computer. If the mount is also controlled with the computer, then it is possible to do remote viewing and/or imaging. The following is a list of what is needed:
Optional, but common equipment:
Using a computer for deep sky video is a bit more complicated than the non-pc setup, but it provides the additional capability to capture images, stack images and perform dark frame subtraction on the fly. It is also possible to control the camera with the computer. If the mount is also controlled with the computer, then it is possible to do remote viewing and/or imaging. The following is a list of what is needed:
- Capable mount
- Telescope
- Video camera
- Power and video cable
- C-Mount adapter
- Computer
- Video capture device
- Camera computer control cable
- RS232 to USB adapter and USB cable
- RS485 to RS232 adapter for 1/3" cameras
- Power for everything
Optional, but common equipment:
- Focal reducer
- Filters (Light pollution and IR Block)
- USB Extension Cables
- Powered USB Hub

Setup, step by step:
1. Set up, focus and align your scope as you normally would with an EP.
2. Slew to a bright star and center it in the EP.
3. Replace the EP with the camera using a C-Mount adapter or focal reducer and re-balance the scope.
1. Set up, focus and align your scope as you normally would with an EP.
2. Slew to a bright star and center it in the EP.
3. Replace the EP with the camera using a C-Mount adapter or focal reducer and re-balance the scope.
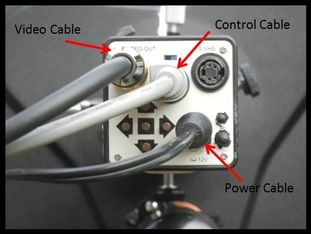
4. Attach the power cable and video cable to the back of the camera. If the camera has both S-Video and Composite video connections, you can use whichever you prefer. Or send one to the video capture device and the other to a monitor. An option is to have a small monitor at the scope for focusing and alignment.
5. For remote camera control, attach the hand remote cable or the pc control cable to the remote control connector, either "Auto-Iris" or "Aux" as shown in your camera manual.
6. Provide strain relief for the cables so that they do not come loose or cause problems with mount tracking.
5. For remote camera control, attach the hand remote cable or the pc control cable to the remote control connector, either "Auto-Iris" or "Aux" as shown in your camera manual.
6. Provide strain relief for the cables so that they do not come loose or cause problems with mount tracking.
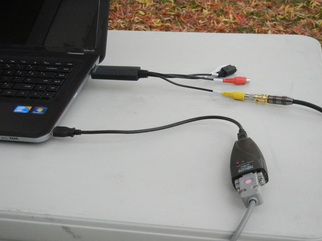
7. Attach the other end of the video cable to the input of the video capture device, color coded yellow. For an RCA connection you will need a BNC to RCA adapter unless the video cable has an integrated adapter. Connect the video capture device to one of the USB inputs of the computer (a separate USB cable may be needed)
8. If using the computer to control the camera, connect the camera control cable to the RS232 adapter (may need an RS485 to RS232 adapter as well). Then connect the output of the RS232 to one of the USB inputs of the computer. An additional USB cable may be necessary.
9. Connect the camera power cable to the power source, either a 12VDC battery or a 110VAC to 12VDC transformer. Most cameras draw less than 0.5Amp, but those with TEC need ~1.5Amp
10. If desired, a powered USB hub can be used to minimize the number of cables used. It is possible to connect the output of the video capture device and RS232 adapter to the hub and then run a single USB cable from the hub to one of the USB inputs on the computer. The hub can also be used for the mount control cable and the USB output of a guide scope to eliminate two more cables.
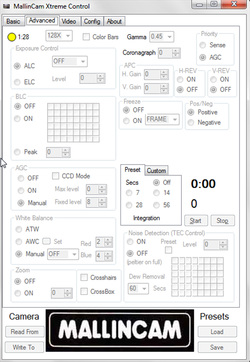
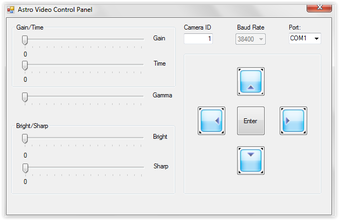
11. Next you will want to start your camera control program. Examples include the various Mallincam Control programs which are available for free on the Mallincam web site, along with Miloslick, which works for most Mallincam cameras. These will not only allow you to control the camera settings, but will provide an image preview, capture images, stack images on the fly and much, much more. You can also use one of many free image preview and capture programs like Sharpcap, Amcap, etc., to view, capture and/or stack images but these will not allow control of the settings of analog cameras. You will need to control the camera with the buttons on the back of the camera or with a hand control if it has one. I will not to go through the details of the various software here. Regardless of the one you use, you will still need to follow some general suggestions for focusing, finding and centering objects of interest.
11. Next you will want to start your camera control program. Examples include the various Mallincam Control programs which are available for free on the Mallincam web site, along with Miloslick, which works for most Mallincam cameras. These will not only allow you to control the camera settings, but will provide an image preview, capture images, stack images on the fly and much, much more. You can also use one of many free image preview and capture programs like Sharpcap, Amcap, etc., to view, capture and/or stack images but these will not allow control of the settings of analog cameras. You will need to control the camera with the buttons on the back of the camera or with a hand control if it has one. I will not to go through the details of the various software here. Regardless of the one you use, you will still need to follow some general suggestions for focusing, finding and centering objects of interest.
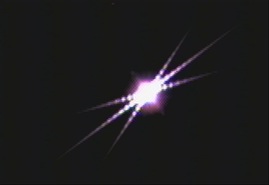
12. Set the exposure to ~2 seconds, Gain (AGC) to High and Gamma to Low (or 0.3). You will have to consult the software manual to know how to do this. These settings will provide high sensitivity and a fast response which are best for focusing. If the star was properly centered, you should see an out- of-focus star on the monitor. You can adjust the focus knob and watch the image change on the monitor. If the image gets larger, turn the focus knob the other way. A Bahtinov mask is very helpful to get a good focus. Just center the line within the "X" pattern as shown in the picture at left. If you cannot reach focus turning the knob fully in either direction, you may need an extension tube to move the camera further out if you are using a refractor or SCT. For some Newtonians, you may not be able to get the camera close enough to the primary mirror to reach focus. The possible solutions for this are: 1) Use a low profile focuser; 2) Use one of the smaller format cameras which can fit inside a 2" focuser, but be careful it doesn't fall into the secondary mirror; 3) Modify the telescope so that you can move the primary mirror closer to the secondary.
13. Once focused, remove the Bahtinov mask if one is used and slew to a deep sky object of interest. Leave the Gain on high, Gamma on Low and increase the exposure to about 20 seconds. These settings are to help you confirm that the object of interest is centered in the field of view. If not, center it. If it is not visible at all, you may have to do a search by moving the telescope around the general area. The larger the focal length of your system, the more difficult it may be to find and center the object unless your GoTo alignment is very good. Deep sky video is usually performed at a focal ratio of f/5 or lower to give a wider FOV and shorter exposure requirements.
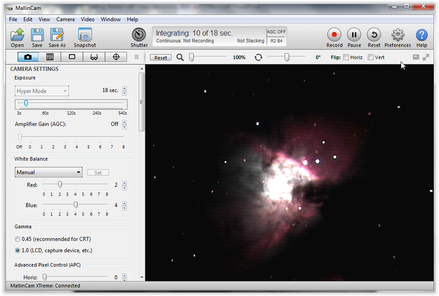
14. After you have confirmed that the object is centered, adjust your camera settings to get the most pleasing image according to your taste. Both Mallincam and Astro-Video-Systems have on-line manuals which will provide a lot of information on the best settings to use under different conditions. There are also images posted on the Mallincam and AVS Yahoo sites and Cloudy Nights EAA forum, often with detailed information on camera settings. Here are some general suggestions for camera settings:
- When using a camera with internal frame averaging (3D-DNR or Intermul) such as all of the cameras from AVS, the Lntech 300 and the Mallincam Micro and Super there are two options: 1) Use the frame averaging to reduce image noise but wait longer to see the final image; 2) Do not use frame averaging and get a faster, but much nosier image. My preference is the first, so I will describe a suggested procedure for that here. Set 3D-DNR to the maximum, 5. This will result in the camera internally averaging 5 frames for a better image. AGC must be on for 3D-DNR to work. 3D-DNR greatly reduces noise and provides a more detailed image at the cost of a longer wait time for the final image to appear. With 3D-DNR set to 5 and the exposure set to 1024X, it will take 5 x 17sec = 85sec for the camera to complete the averaging process, assuming it is an NTSC camera. For a PAL camera it would take 5 x 20sec = 100sec. The image will slowly improve at 17sec intervals until it reaches 85sec. Also, set Gamma to High (1) to minimize the brightness of the background. If the object is overexposed, turn down the exposure. If it is still under exposed lower the Gamma. You should experiment with different values of AGC, exposure and Gamma. On many cameras, AGC will cause amp glow which is a brightening of the background in the upper left hand corner or top center of the image. This is caused by noise from the readout amplifier picked up by the CCD. Some cameras, like those from AVS have been modified to eliminate amp glow. Lower Gamma values stretch the image grey scale. Longer exposures bring out more detail but require better tracking capability.
- When using a camera without internal stacking, I like to try not to use AGC to avoid the background noise from amp glow. I prefer to use longer exposures because my mounts will usually support them. And, sometimes I do autoguiding to get excellent long exposure tracking. Also, I like to set Gamma to 1 to avoid washing out the background. Both of these work extremely well at dark sites. However, from my backyard I often have to lower Gamma and sometimes turn on AGC, but usually only to the mid-point.
- You will also want to make adjustments to the Brightness and Contrast settings on your monitor to get the best possible image.
© 2024 Curtis V. Macchioni